Get to know your Macbook (2) : mission control
When using a MacBook, you will feel uncomfortable due to the small screen. In fact, this is also a difficulty experienced by ordinary laptops. In Windows, I mainly used the alt+tab function, and although it was inconvenient when I first used a MacBook, I used cmd+tab. However, when I was getting used to the Korean/English switch key rather than the capslock key, I wondered if there was a way to solve it in a more convenient way. The first solution was to use the paid application magnet to split the screen. However, the split screen was still inconvenient on the small screen of the MacBook. Then, while searching for a Naver cafe by chance, I found out that there was a thing called Space, and started searching for ways to utilize it. And let’s take a look at how to use it.
Desktop? Space? Mission Control?
First, I think we need to clear up some of these confusing terms. First, in Mac OS, an app called mission control is used to control the transition between screens. The app allocates each space and controls transitions between spaces. It will be easy to understand if you think that space is an area allocated by mission control. And when allocating new space, mission control basically allocates new space like desktop1,2,3,4… In the case of the most basic screen, it is designated as the desktop.
Mission Control, how to run it?
The way to run mission control is very simple. But it takes some getting used to. The first basic method is to use Spotlight (cmd+space). All you have to do is run the spotlight and write the mission control. The second method is to use the trackpad. Swipe up with three fingers on the trackpad to launch mission control. (For reference, if you swipe down with three fingers, you can check the windows if you have multiple windows open in the application you are currently using.) The third method is to press Control (^) + arrow key ↑. The last method is to execute mission control in the finder-application program. Using one of these methods, we’ll get the next window we want.
 Mission Control execution screen: It can be divided into largely allocated spaces (top) and applications running in the current space (bottom).
Mission Control, how to use it? (1): Space allocation
Mission Control may not seem like a big deal in a way, but if you use it well, it is a way to dramatically increase the usability of your MacBook. It could be said that the most important thing in Mission Control is allocating space. First, there are two ways to allocate space.
-
First, add it manually The first method is to manually add spaces. At the top of Mission Control is a section where spaces are allocated. At the right end of this section is a section marked with a +. If you click this +, you can see that a new space is designated as Desktop 2. We can go to this desktop and launch a new application. Alternatively, you can assign an already running application from the mission control window by dragging it to the new space. At this time, multiple application programs can be executed on one desktop, but each application program can be executed only in one space. (That is, applications running on desktop 1 cannot run on desktop 2.)
-
Second, setting by application program The second method is to set the full screen in each application program. If you set the full screen through the button at the top left of each application, you will be able to confirm that this application is allocated a new space. Alternatively, similar to dragging and allocating an application program running in the previous space, if you drag an application program and move it to the part marked with +, you will be able to confirm that a new space in the form of a full screen is created. At this time, the difference from the first method is that only one application program is allocated to this space.
Mission Control, how to use it?(2): How to use it
If you have assigned application programs to be used in each space, you should use them. The first thing we need to do this is how to convert between spaces. The first way to switch between spaces is to run it on the mission control screen. After opening the mission control screen through the method described above, you can move to the desired space by selecting the desired space at the top of the screen. The second method is to use a shortcut key. You can move between spaces by holding down the control (^) key and pressing the left and right arrow buttons. The last method is to use the trackpad. Similar to the way to open the mission control window, you can also move to the desired space by swiping left and right on the trackpad with three fingers. Also, if an application already allocated to a space is called from the dock or through cmd+tab, the application is automatically moved to the allocated space. Considering the above contents, we will feel the need to arrange the space that we mainly use. This is because movement between spaces is mainly movement to spaces arranged on the left and right. To do this, it is good to rearrange the order by dragging each space after running the mission control. As for the form of rearrangement, it is good to place items with similarities between works to the left and right.

Each item can be arranged in order by dragging. At this time, the order of arrangement should be based on the similarity of the work.
##More details
However, there is a caveat here. By default, the most recently used space is at the front. If this setting messes up the order of spaces that the user has set for their own convenience, uncheck the [Automatically rearrange spaces according to recent usage history] checkbox in [System Preferences]-[mission control]. This can be prevented.
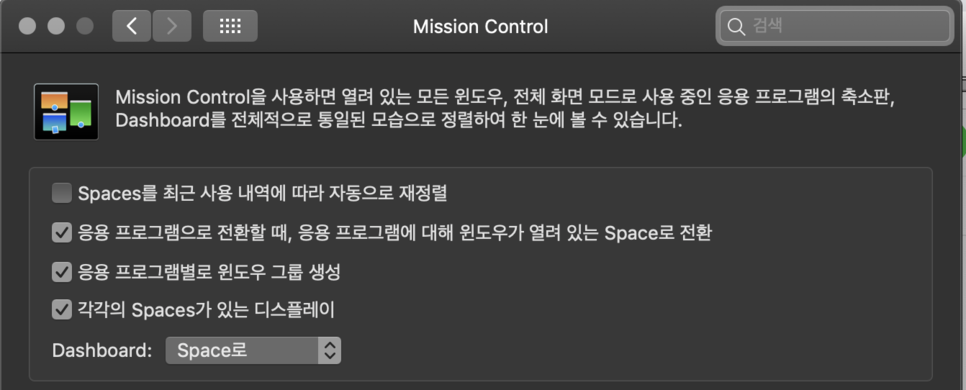
In addition, you can assign the dashboard to a single space or change the shortcut keys in the environment settings, so let’s take advantage of this.